We’ve been living in a very small space in our Puch for a year now. There is only a little room for a kitchen. At the same time, having varied, healthy, and fresh food is important to us. That’s why we’ve spent a lot of time thinking about questions like: How and where do we cook? Which cooking utensils are truly necessary? And how does everything stay well-organized? A functional and compact camper kitchen is especially challenging in a mini camper. In this post, we introduce our mini camper kitchen, show our kitchen equipment, share which solutions have proven effective, and what we would do differently next time.
Note: Links marked with an * are affiliate links. If you purchase something through this link, we receive a small commission. The price remains the same for you.
Mini Camper Kitchen – Options and Ideas for the Kitchen Setup
Before we started the conversion, we looked at various kitchen solutions in small campers and weighed the pros and cons. We mainly came across three approaches: an indoor kitchen unit, an externally mounted kitchen box, and a pull-out kitchen drawer.
Indoor Kitchen Unit
Many campers install a kitchen unit with a stove and sink directly inside the vehicle. Even in small vehicles like ours, we have seen several examples.
| Advantage | Disadvantage |
| – Protection from bad weather (Rain, wind, cold) – Comfortable, especially in regions with unpredictable weather | – Reduces the sleeping space significantly, if there is no roof tent or pop-up roof available – Takes up valuable space inside the interior – Cooking odors remain in the vehicle |
This option was not an option for us, as the remaining sleeping space would have been only about 1.10 meters. For a longer trip, that was too cramped for us.
Externally mounted kitchen box
An externally mounted kitchen box is an alternative for a mini camper kitchen. A kitchen box provides storage space for a stove and cooking utensils and creates a workspace when the box is opened.
| Advantage | Disadvantage |
| – Saves space inside the interior - By opening the box it creates workspace – Odors and fumes stay outside - The kitchen can be used without having to convert the bed - The kitchen is usable even with the door closed | – Expensive to purchase – Vulnerable to weather – the box must be watertight – When it rains a canopy is required |
We also decided against this solution because such boxes are expensive on the one hand, and on the other hand, they would have blocked our window, making it impossible to open.
Pull-out kitchen drawer
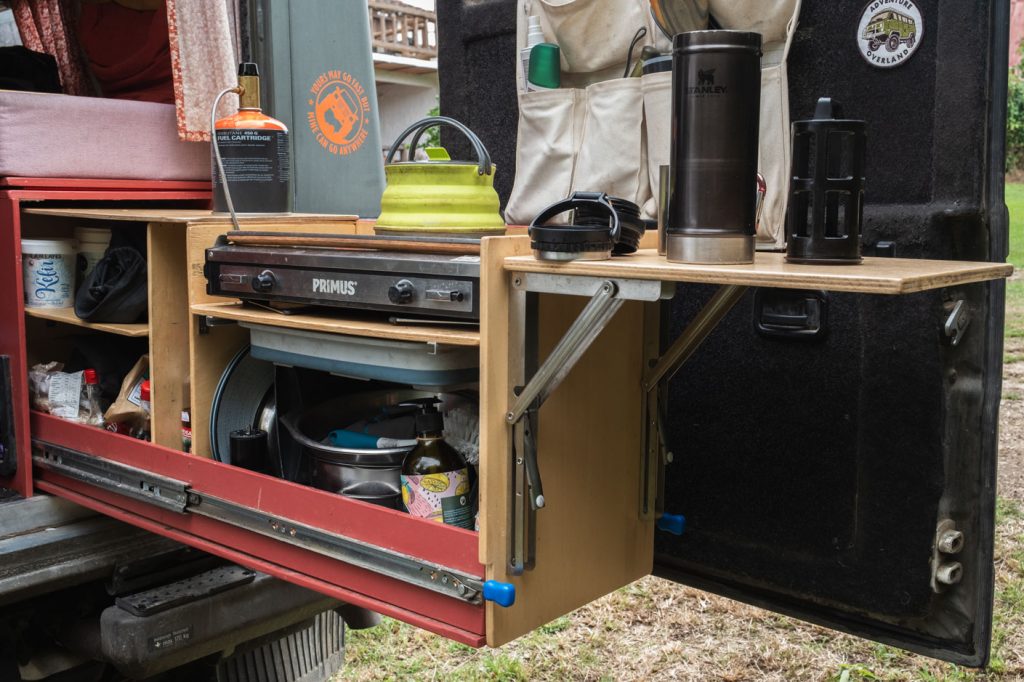
The pull-out kitchen drawer was the best solution for us. In our case, it can be pulled out from the rear door while remaining space-saving.
| Advantage | Disadvantage |
| – Odors and fumes stay outside - The kitchen can be used without having to convert the bed | – When it rains a canopy is required – Impractical in cold weather, as the door needs to be open |
Details of our kitchen drawer
- Heavy-duty slide: KV2-100-H53-L950-LC Lock-in/out by Junker (supports up to 100 kg)
- Materials: Pine plywood for the base and side walls for stability, lightweight poplar plywood for partitions.
- Finish: mehrere Lagen Alpina clear coat (silk matte)*- sehr robust
- Additional workspace: Klapptisch mit Heavy-duty folding bracket*
Camping stoves compared: Gasoline, gas, electric, and induction
Once you’ve decided on a kitchen setup for your camper, the next question is which camping stove is the right one. Choosing the right camping stove depends on many factors. Here’s a comparison of the most popular systems:
| Advantage | Disadvantage | |
| Gasoline stove | – Gasoline is available almost everywhere, even in remote regions – Good performance even in cold temperatures and at high altitudes – Relatively inexpensive to operate when using regular vehicle gasoline | – Safety risk due to the flammability of gasoline – Not suitable for indoor use – Regular maintenance and cleaning required to remove soot buildup – Noise generation during operation – Somewhat complicated to handle, (preheating required) |
| Gas stove | – Easy to use, ready to go quickly – Clean combustion – Gas for bottles is usually inexpensive and widely available | – Refilling gas bottles can be challenging, depending on local regulations and adapter availability – Availability of gas cartridges is not guaranteed everywhere – Disposable cartridges are expensive and not environmentally friendly – Performance may decrease in cold temperatures or at high altitudes . |
| Induction stove | – Efficient due to quick and direct heat generation – Particularly safe, as the cooking surface itself does not get hot – When using solar energy an environmentally friendly alternative – Energy savings compared to traditional electric cooktops | – Reliable power supply or a strong onboard battery is required – Special magnetic cookware required – Higher purchase price compared to other types of stoves |
Our stoves: Primus Tupike and Primus OmniLite TI
Wir haben zwei unterschiedliche Campingkocher dabei: den Primus Tupike* und den Primus OmniLite TI*. Beide haben sich auf unseren Reisen als zuverlässige Begleiter erwiesen und bringen völlig unterschiedliceh Vor- und Nachteile mit sich.
Primus Tupike gas stove
The Primus Tupike* ist ein kompakter Tischgaskocher mit zwei Flammen von je 3000 Watt. Er ist handlich, sehr ruhig und dank der Piezozündung ist er schnell einsatzbereit, ohne dass man ein Feuerzeug benötigt. Geliefert wird er mit einem Anschluss für Gaskartuschen sowie einem Adapter für 5/11 kg Flaschen. Primus bietet auch weitere Adapter für die gängsten Gasflaschenanschlüsse an. Diese müssen allerdings separat hinzugekauft werden. Der Verbrauch liegt bei 250 g pro Stunde (3,5 kW bei 1 bar Gasdruck).
Unser Primus Tupike campingstove* hat seinen festen Platz in unsere Küchenschublade. Ein großer Vorteil ist, dass es ein mobiler Kocher ist, den wir bei Bedarf auch auf unseren Campingtisch stellen können oder auch auf unseren Tisch im Fahrzeuginnenraum. Durch den mobilen Kocher bleiben wir flexibel, können im Schatten kochen, sollte das Fahrzeug in der Sonne stehen und können auch schnelle Gerichte wie Nudeln mit Soße bei wirklich schlechtem Wetter im Innenraum kochen.
Primus OmniLite TI – The All-Rounder
The Primus OmniLite TI* ist klein, kompakt und ein echter Allrounder. Wir hatten den Kocher schon vor unserer Südamerika Reise auf Campingreisen im Einsatz. Dieser Kocher ist extrem vielseitig und kann mit unterschiedlichen Brennstoffen wie Benzin, Diesel, Kerosin und Gas betrieben werden. Dadurch ist er besonders geeignet für Reisen in abgelegene Regionen, in denen Gas schwer erhältlich ist sowie für extreme Temperaturen und Höhen. Sein geringes Gewicht und die kompakte Bauweise machen ihn ideal für Wanderungen oder Touren mit wenig Stauraum. Wie alle Benzinkocher benötigt der Primus OmniLite TI* bei der Verwendung mit Benzin oder Diesel etwas Übung bei der Handhabung, da das Vorheizen und die Reinigung mehr Aufwand erfordern als bei einem Gaskocher. Neben der Verwendung für Wanderungen und Touren mit dem Zelt, nutzen wir den OmniLite* auch für all Gerichte, die länger gekocht werden müssen, denn Benzin ist günstiger als Gaskartuschen. Zum Brot backen, Kartoffeln kochen oder auch für Lasagne nutzen wir deswegen den Primus OmniLite TI*.
Gas Stove: Cartridges or Gas Bottle?
Anyone traveling with a gas stove has the choice between gas cartridges and gas bottles as a fuel source. Both options have pros and cons, which should be weighed depending on the duration of the trip, the region, and personal needs.
Gas cartridges: Gaskartuschen sind besonders leicht und kompakt, was sie ideal für Kurztrips und kleinere Campingausflüge macht. Sie sind einfach zu handhaben und lassen sich ohne zusätzlichen Adapter direkt an den Kocher anschließen. Zudem können sie sowohl mit dem Primus Tupike*, als auch dem OmniLite verwendet werden. In Europa sind sie in vielen Outdoor-Geschäften und Campingläden erhältlich. Hier findet man auch verschiedene Mischungen, beispielsweise wintergas*, das speziell für kalte Temperaturen geeignet ist. Allerdings können die Kosten für Einwegkartuschen bei längeren Reisen schnell in die Höhe steigen und ihre Verfügbarkeit ist je nach Region eingeschränkt. Zudem sind sie nicht besonders umweltfreundlich, da die leeren Kartuschen oft nicht recycelbar sind.
Gas Bottle or Gas Tank: Gas bottles offer a more sustainable and cost-effective solution for longer trips. They are refillable, which reduces waste and significantly lowers the cost per refill. Depending on available space, they come in various capacities, which is a major advantage for self-sufficient travel. However, handling them requires more planning, as refilling gas bottles is regulated differently in each country and may require special adapters. In some countries, refilling mobile gas bottles is not legal. Large motorhomes have a gas compartment that allows gas to vent outside. In a mini camper, there is usually no space for this. Therefore, it’s important to consider which countries you’ll be traveling in and whether a mobile gas bottle, mounted externally for example, can be refilled. Additionally, gas bottles are heavier and take up more space in the camper.
Which Option Is the Right One?
For short trips or travels in regions with good cartridge availability, gas cartridges are the simpler choice for a mini camper, as they eliminate the need to install a gas compartment. They are straightforward, lightweight, and require no additional equipment. However, for longer journeys or self-sufficient camping, gas bottles are significantly more sustainable and cost-efficient. Depending on travel destinations, one possible solution is mounting a gas bottle externally on the vehicle, such as on a spare tire holder or roof rack. For this option, you should consider in advance which countries you plan to visit, as refilling these bottles is not legal everywhere.
Our Cooking Utensils: What We Bring Along
When it comes to cooking utensils, finding a good balance between space-saving and functionality is key in a mini camper kitchen. A well-equipped camping kitchen not only makes cooking on the road easier but also more versatile. At the same time, there is limited space for utensils in a small camper van. Here’s what we bring along, allowing us to cook everything we want in our camper.
- 2 pots: one small and one big
- 1 frying pan
- Omnia camping stove with silicone insert*: für Brot, Lasagne, Ofengemüse und auch sonst alles was man zu Hause im Ofen zubereitet
- Kettle from Sea to Summit*: spart Energie beim erhitzen von Wasser und ist platzsparend
- French Press from Stanley*: robust, leicht zu reinigen und isoliert – ideal für heißen Kaffee unterwegs
- Coffee grinder: we like to grind our coffee fresh, plus beans are usually of higher quality than pre-ground coffee.
- 2 plates
- 2 collapsible bowls from Sea to Summit*
- 1 bowl with a strainer insert
- 1 cutting board
- Peeler
- Cutlery for two people
- 2 cups
- 2 mugs
- Bread knife: we bought this on the road because we really missed it
- 2 sharp knives
- Multitool with a bottle opener and corkscrew
- 1 Thermal flask*
- Several lunch boxes for storing leftovers
- 1 whisk
- 1 spatula
- 1 small, compact knife sharpener
Conclusion: What would we do differently in our mini camper kitchen?
Rückblickend sind wir mit unserer Minicamper Küche sehr zufrieden. Trotzdem würden wir gerne aus Kostengründen von Gaskartuschen auf eine Gasflasche umsteigen. Vor unserer Reise haben wir uns zwar länger mit dieser Option befasst, am Ende war aber einfach keine Zeit mehr uns um einen geeigneten Halter für eine Flasche zu kümmern. Würden wir die Schublade nochmal bauen, würden wir zudem etwas dickeres Pappelsperrholz oder ebenfalls das härtere Kiefernsperrholz für die Innenwände und Regalböden verwenden.
Apart from this point, our current kitchen setup meets all our requirements. The pull-out kitchen drawer offers the flexibility we need, and our selection of cooking utensils ensures we are well equipped. Switching to a refillable gas bottle would be the next logical improvement to make the setup even more practical and sustainable.