Do you want to be self-sufficient with your camper, just like us? Then you need a stable and reliable power supply. With the right solar system in your camper, it's not rocket science. We will show you what types of solar panels are available, how to determine how much solar power you need in your camper, and how to install the solar system.
Note: Links marked with an * are affiliate links. If you purchase something through this link, we receive a small commission. The price remains the same for you.

Which types of solar cells for the solar system in the camper?
When we first started looking into our solar system for the camper, we were initially overwhelmed by the many providers and different types of solar modules. There are various cell types and module types that differ in efficiency, cost, and areas of application.
Overview of solar cell types
There are three types of solar cells suitable for installation in a camper.
| Monocrystalline cells | Polycrystalline cells | CIS cells | |
| Advantage | + Highest efficiency among the cells: 20% and higher + Monocrystalline cells are still effective even in low light conditions. + Have a long lifespan | + Efficient in low light + Resistant to partial shading + The average efficiency is around 20% | + Long lifespan + Average efficiency of around 15% |
| Disadvantage | – Higher acquisition costs | – Higher costs – High module weight | – Less efficient in low light conditions |
Permanently installed solar panels and foldable modules
The next question is whether you want to install a permanently fixed panel on the camper roof or prefer a portable, foldable module. Both have their advantages and disadvantages. With permanently installed panels, you also need to differentiate between rigid-framed modules and flexible adhesive modules.
| Permanently installed modules (Rigid framed modules) | Permanently installed modules (Flexible adhesive modules) | Foldable / flexible modules | |
| Advantage | + Best price/performance ratio + Easy replacement in case of damage + Air circulation under the panel maintains performance | + No increase in vehicle height, as the solar panel sits directly on the roof + Easy installation + Lightweight (200 watts ~ 6.25 kg) | + No installation required + Can be adjusted according to the position of the sun (higher yield in the morning and evening) + Does not take up space on the camper roof |
| Disadvantage | – Vehicle height increases - Weight | – Price/performance is average – Difficult to replace if defective – No air circulation under the panel – High heat generation can lead to a decrease in performance and potentially damage the panel | - Higher price – Requires space inside the camper (for transport) – Needs to be set up (time) |
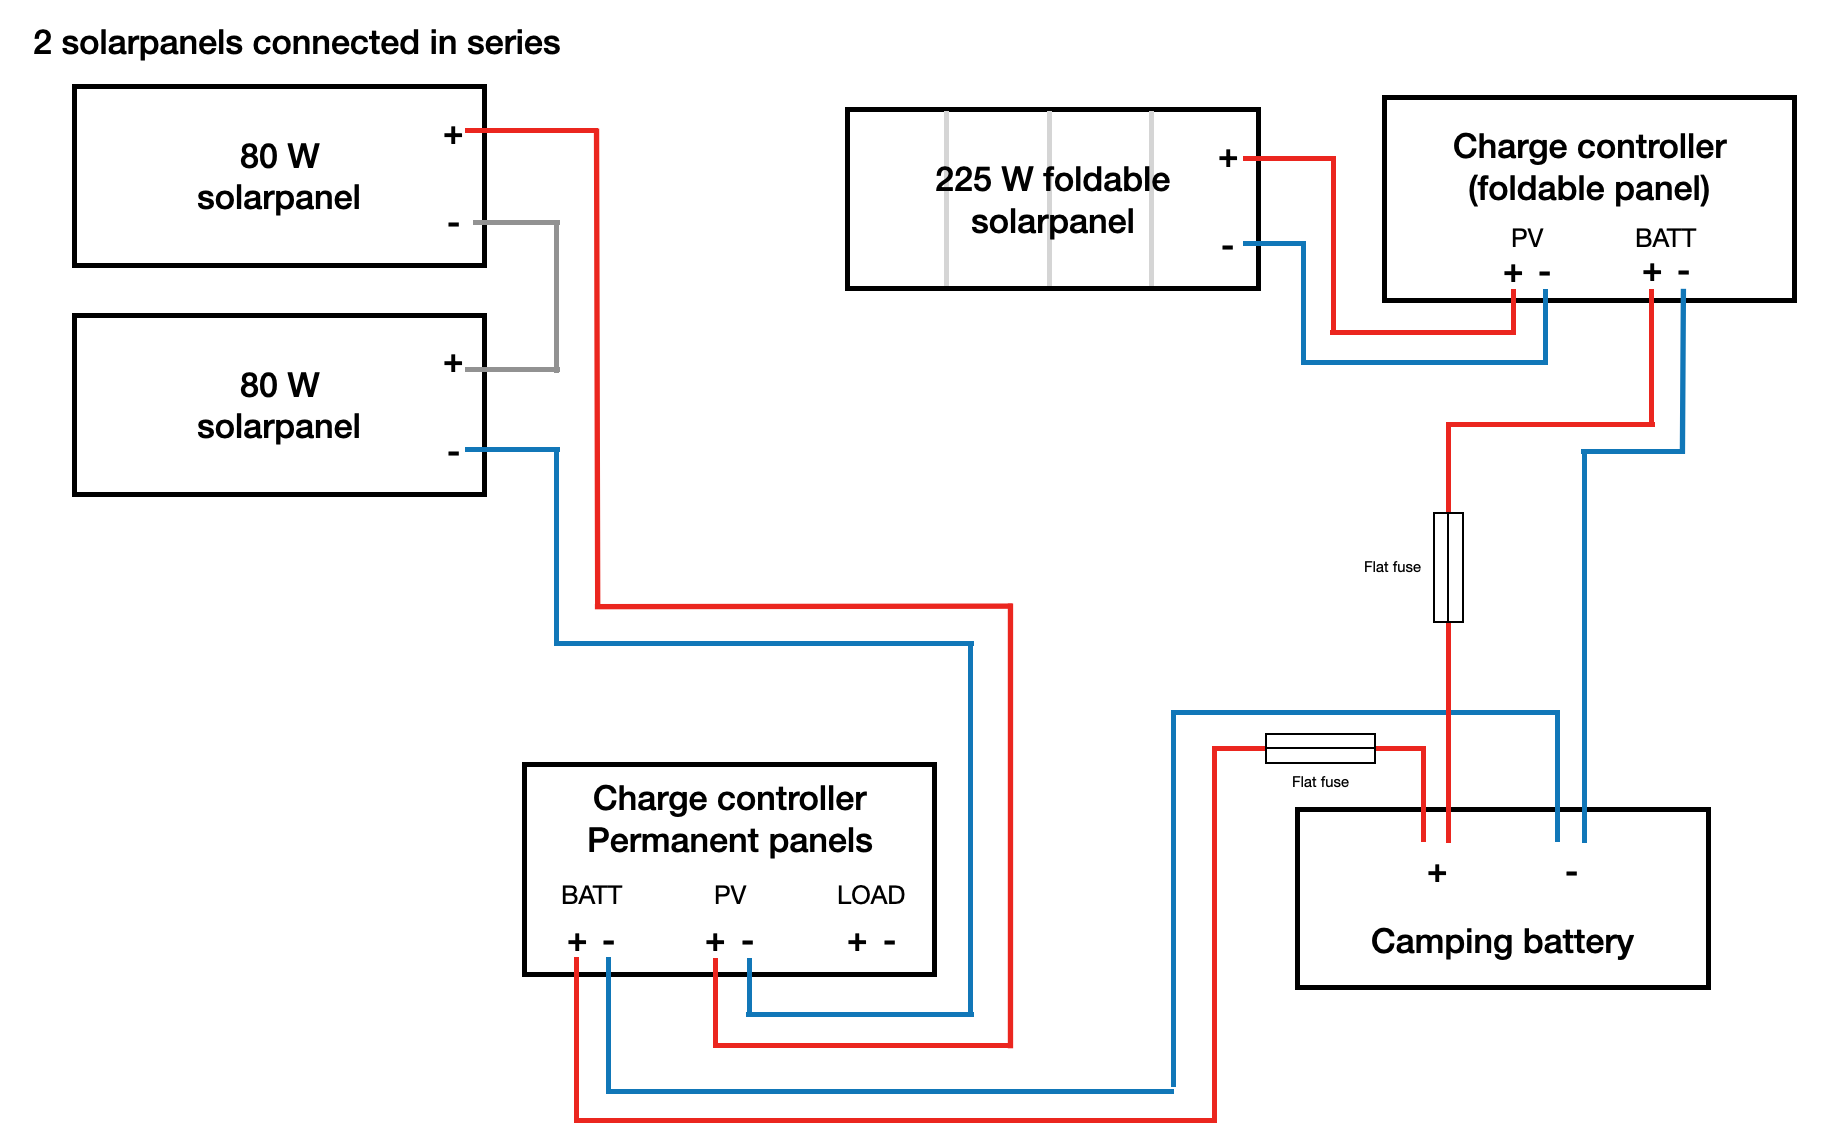
We ultimately decided on a combination of two fixed, rigid solar panels on the roof and a foldable solar panel, also known as a solar bag. This setup works very well for us, as we can park in the shade on hot days and also add an extra 225 watts with the foldable module on slightly cloudy days, thus increasing our power output.
How much solar power does my camper’s solar system need?
The next step is to determine how much electricity your solar system should generate. Several factors come into play. Ultimately, it's about finding the perfect balance between power, space, and weight savings.
Power of solar panels
First of all, the performance of your panel depends on the choice of cell types. We chose a monocrystalline panel and will go through the example using this panel. If, like us, you have an 80-watt, 24-volt monocrystalline solar module, it produces 80 watts per hour under ideal conditions, after the solar controller has converted it to 12 volts. In Ah, that would be 6.66 Ah (80 watts : 12 volts = 6.66 Ah), which you could theoretically produce per hour under optimal conditions.
However, the optimal case is often not the reality. The sky might be cloudy, it could be winter, etc. The same applies when traveling to northern regions, where the sun is lower in the sky, causing your solar panels to produce less power. This is also true during the morning and evening hours. Therefore, it's important to consider when and where you plan to travel and how long you want to be self-sufficient. In this context, self-sufficient means without adding shore power and without intermediate driving, so without charging your camper battery through the alternator.
Number of electrical devices & frequency of use
Additionally, the required power for your solar panels depends on the electrical devices you plan to operate and how long they are used each day. Here, we list our devices. The operating times are approximate and may vary from week to week.
| Consumers | Power consumption (Watt) | Operating time per day in hours | Energy per day in watt-hours (Wh) |
| Compressor refrigerator | 40 | 5 | 175 (at 20°C ambient temperature) |
| Water pump | 180 | 0,2 | 36 |
| Laptop 1 | 35 | 3 | 105 |
| Laptop 2 | 75 | 2 | 150 |
| Starlink | 60 | 4 | 240 |
| Mobile phone 2 | 20 | 1 | 20 |
| Mobile phone 2 | 20 | 1 | 20 |
| Camera | 15 | ||
| Drone | 38 | 0,2 | 7,6 |
| Total | 754 |
*We excluded the camera from the calculation, as we only need to charge it at most once a month.*
Solar energy by season
- Summer: In summer, you can expect around 5-7 effective sunlight hours. Of course, this varies from day to day, and sometimes the weather can be poor for an entire week even in summer, but it helps with the calculation and gives a sense of the generated electricity. P = 754 Wh ÷ 6 hours = 126 W (P = electrical power in watts). In summer, we would need to install 126-watt modules to meet our daily needs under optimal conditions.
- Winter: In winter, in Germany, you can expect 1-2 effective sunlight hours. Using the same calculation as before, this means we would need to install over 503 watts on the roof.
- Transition period: In spring and autumn, the sun is not as high as in summer. Of course, it makes a big difference whether you're in Morocco in autumn or traveling to Scandinavia. For Germany, you can assume around 3-5 effective sunlight hours during the transition period. Using the same calculation with our previous consumption, this means we would need to install 189 watts.
Series or parallel connection of the modules
If you want to install more than one solar panel on the roof, you can connect them in series or in parallel. There is no right or wrong here; both options have their advantages and disadvantages.
Parallel connection of the solar system
For the parallel connection, all positive terminals of the solar modules are connected together and then connected to the positive terminal of the charge controller. You do the same with the negative terminals. So, connect all negative terminals of the solar module and then connect them to the negative terminal of the charge controller.
In parallel connection, the individual wattages of the modules add up. Two 80-watt modules would then generate 160 watts in this case. The voltage remains at 12 volts. Of course, you can also connect modules that do not have the same wattage. It is only important that they have the same voltage and that the open-circuit voltages (UL) of the modules match.
Advantage of parallel connection: The big advantage of parallel connection is that each individual module operates independently. The individual modules still generate electricity even if one of the modules is shaded.
Note: If you connect your modules in parallel, higher currents will flow through the cables. Therefore, check if the cable cross-section is sufficient. Additionally, your charge controller must be rated for the current.
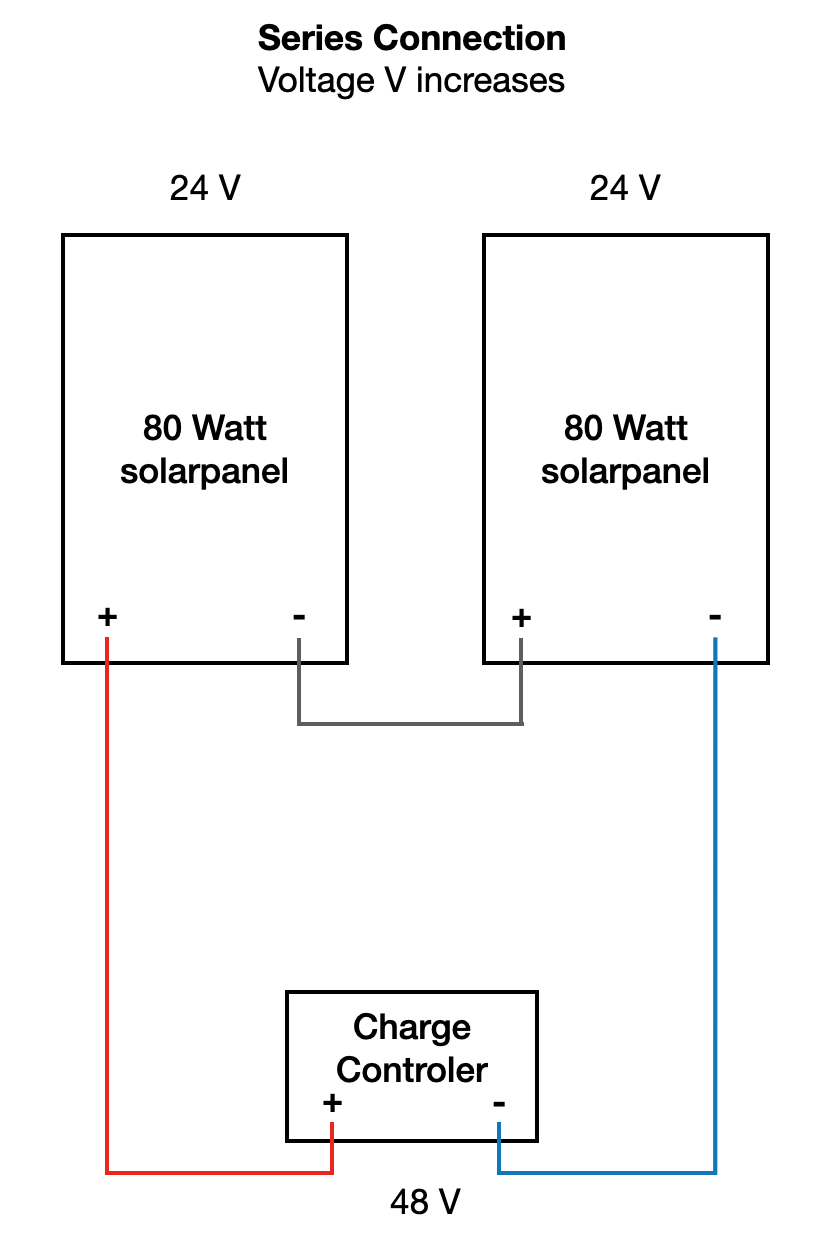
Series connection of the solar system
For the series connection, you run a cable from the positive terminal of the first solar module to the positive terminal of the charge controller. From the negative terminal of the last solar module, a cable goes to the negative terminal of the charge controller. Now, you connect all the modules between the first and last module, always connecting positive to negative.
Schaltest du deine Solarmodule in Reihe, bleibt der Strom gleich, jedoch erhöht sich die Spannung. Hast du 2 Solarpanele mit 80 Watt und 24 Volt, würde sich die Spannung bei Reihenschaltung auf 48 Volt addieren. Käme noch ein drittes hinzu wären es 72 und so weiter.
Due to the low current, a smaller cable cross-section can be used.
Advantage of series connection: The big advantage of connecting in series is the higher voltage, which ensures that even in low light conditions (for example, in the evening or on cloudy days), there is still enough voltage to charge the camping battery.
Note: Make sure that your charge controller is suitable for the high voltage.
Parallel or series connection – and which is better?
Whether you choose series or parallel connection is up to you. There isn't a better or worse option here. Both come with advantages and disadvantages. We mainly opted for series connection due to the simpler cable management. In principle, you can always change it later if you find that you're not satisfied with your choice.
What else is needed for installation and mounting?
Solar charger
To charge your battery with solar power, you'll need a charge controller. We recommend using an MPPT charge controller. While they are more expensive than PWM controllers, they are also more effective and help you get the maximum output from your modules.
Dein Solarregler sollte zudem zum Batterietyp passen (AGM-, GEL-, Nassbaterie oder LiFePO4). Wir haben bei uns den Victron Smartsolar MPPT 75/15* für die festverbauten Module und den Victron Smartsolar 100/20* für das faltbare Modul verbaut. Mit Hilfe des MPPT size calculator you can calculate which controller is suitable for your solar modules. Via Bluetooth, we can connect the controller to our phones and receive information about the performance of our solar system. Before connecting the charge controller to the modules, it must be configured for your modules within the app.
Why two separate charge controllers?
Wir haben einen Laderegler* für die festverbauten Module und einen separaten Regler für das faltbare Modul. Die Verwendung von zwei separaten Ladereglern ermöglicht es, jede Solaranlage unabhängig voneinander optimal zu nutzen, was Leistungsverluste und ineffizientes Laden vermeidet. Die beiden Regler können über die Victron-App in einem virtuellen Netzwerk miteinander verbunden werden. Dies erlaubt ihnen, ihre Ladeprozesse abzustimmen und die verfügbare Solarenergie effizienter zu nutzen. Durch diese Kommunikation wird sichergestellt, dass die Batterie immer auf die bestmögliche Weise geladen wird, basierend auf den jeweiligen Bedingungen der beiden Solarmodule.
More information about foldable solar panels can be found in our post: Foldable solar panel for the camper.


Camping battery
Of course, you still need a camping battery, which you want to charge via the solar system. We have installed a 12V 230Ah LiFePO4 battery in our camper.
Mounting material for the solar system in the camper
You can attach a rigid panel to the roof rack as we did, or you can get mounting brackets that you then fix to the roof.
To connect your solar module to the charge controller and the battery, the cable needs to go through the roof. We used the old antenna mounts for this and then sealed them with Sikaflex.
You drill a hole in the roof of your camper, large enough for the cables. For metal roofs, don't forget to file and treat the area with rust protection. Now you can glue a cable entry point over the hole with Sikaflex and route the cables into the interior of your camper.
Connecting modules to the charge controller and battery
Now you just need to connect the cables to your charge controller and battery. Positive is connected to positive, and negative to negative. The cables coming from the roof are connected to the solar controller, and from the solar controller, the cables lead to the house battery.
Now the battery should be charged with the help of the solar modules.
Our conclusion on the solar system in the camper
Our conclusion on our solar modules after 8 months of full-time living in the camper is entirely positive. With our battery, the fixed modules, and the foldable module, we can easily live and work in the camper. Only in very rare cases did we need to charge the battery using our alternator charger.
It is important to mention, however, that during the first part of our journey in the south of South America, we benefited from the long daylight hours of summer. Now, closer to the equator, we not only have an optimal sun angle but are also experiencing the dry season with bright blue skies every day.