On our first trip in the camper, we had a 12-liter water canister on board. With our decision to live in the motorhome for an extended period, it was clear that 12 liters would not suffice for a self-sufficient water supply. Therefore, we upgraded our water supply in the camper with a water tank. Due to the limited space, expanding the water system was not an easy task and cost us quite a bit of nerve.
Our goal was to install an autonomous and flexible water supply system where we could use the same water pump for both filling and extracting drinking water.
In the following, we present our drinking water supply in the camper and share our experiences with our current water system in the camper. Additionally, we answer questions like:
- How much water do I need?
- Which pump is the right one?
- How do I ensure drinking water quality in the motorhome?
And we show step by step how we planned and implemented our water supply in the camper on our own.
Note: Links marked with an * are affiliate links. If you purchase something through this link, we receive a small commission. The price remains the same for you.
Calculating Water Consumption – How Much Water Do I Need?
Water weighs quite a bit. Furthermore, a few liters more or less also make a significant difference in terms of space. Especially with a small camper like ours, it was therefore important to correctly calculate our required water consumption in the camper in advance to ensure sufficient water supply while simultaneously not having too much. However, water consumption cannot be determined universally. Everyone is different, so it's important to consider what you actually need and want to use the water for.
| Usage | Our Daily Consumption | |
| Drinking Water | Drinking water consumption can increase significantly on hot days. Also, when we go hiking, we need significantly more drinking water than on cozy days in the camper. | 2-3 liter per person |
| Cooking | How often do you want to cook yourself? What do you prefer to cook? Pasta, rice, or potatoes require a lot of water. If you often cook fresh, this needs to be taken into account. | 1-2 liters per person |
| Brushing Teeth, Washing Hands, etc. | Even the small consumption in between adds up quickly. If we are not parked near a natural water source, we notice this very quickly in our consumption. | 1 liter per person |
| Washing Dishes | Between 10-15 liters can fit in a typical camper sink. Quite a lot, considering that you might need to wash dishes 3 times a day. We mostly wash with water from natural sources. If we don't have access to one, we try to wash as sparingly as possible. | 3 – 4 liters per person |
| Showering | Having your own shower in the camper is great. However, this also reflects in water consumption. Even short showering sessions consume several liters of water. | 0 liter per person |
We primarily use our freshwater as pure drinking water, for cooking, as well as for brushing teeth and washing hands. Sometimes we also have to wash dishes with it, however, we try to avoid this.
The required amount ultimately calculates from:
- Personal Water Consumption
- Available Space
- Payload of the vehicle
- Possibility to refill freshwater (is a filter installed?)
Freshwater Supply – Water Tank or Canister?
After we roughly calculated our water consumption, the question arises whether we should install individual canisters or a water tank and, of course, where we can place them in the vehicle.
| Advantage | Disadvantage | |
| Above-ground Tank | Protection from frost Protection from stone chips and potholes | Takes up valuable space in the camper |
| Below-ground Tank | Saves space in the camper | Loss of ground clearance |
Our decision was to go with a water tank, especially since we found one that fits perfectly into our left bench seat, making it the better choice in terms of space compared to canisters. We ruled out an underfloor tank because we didn't want to lose our ground clearance and wanted to travel to colder areas without worrying about our water supply freezing in the camper. With its large opening, it's easy to fill and clean.
Selection of a suitable water pump
We need a water pump both for water extraction and for filling (from natural sources). There are two types of pumps suitable for use in camper vans: submersible pumps and pressurized water pumps.
When choosing the pump, it's important to consider its required functions. For us, this means using the same pump both for extracting water from the tank and for filling from natural water sources. Additionally, the pump must be powerful enough to push water through our drinking water filters.
Submersible pump
Submersible pumps are submerged into the water tank. A motor inside the pump draws water in and pumps it through a hose. Submersible pumps have several advantages as well as disadvantages.
| Advantages of submersible pumps | Disdvantages of submersible pumps |
| + Very lightweight + Very silent + Take up no space, as they are integrated into the tank + Long lifespan + Cheap | - Cannot run dry – Low water pressure |
High-pressure pump
High-pressure pumps are equipped with multiple membranes that are moved back and forth by a motor. The resulting vacuum sucks in the water and pushes it into the water pipe. A high-pressure pump is mounted outside the water tank and therefore requires additional space. Within the pump, a pressure switch is integrated, which detects when the water pressure in the line drops and then activates the pump. This increases the risk of water damage because, in the event of a leak, the pump would activate. High-pressure pumps can be mounted either hanging or standing.
| Advantages of high-pressure pumps | Disadvantages of high-pressure pumps |
| + Long lifespan + Pressure of up to over 5 bar + May run dry + Flexibility | – Expansive – Loud – Higher weight – Require additional space – Higher risk in case of a leak |
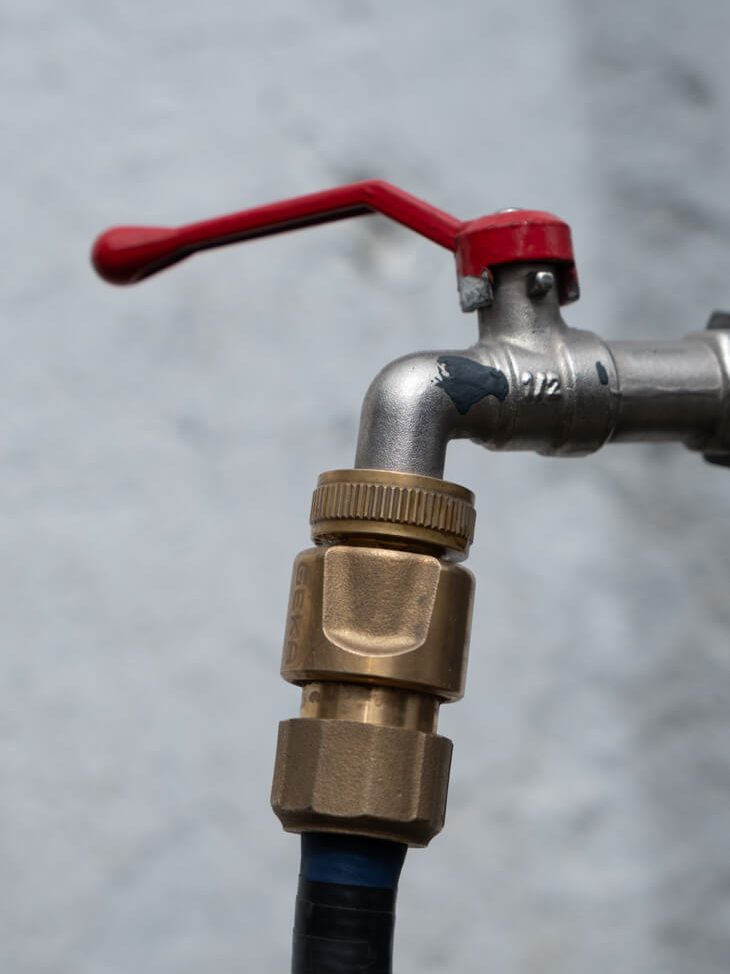
Since we needed a pump both for filling the tank and for withdrawing water, a high-pressure pump was the only option for us. The pump is mounted outside the tank and connected via the Geka plug system. This allows us to easily switch between filling and withdrawing water as needed.
Pressure storage tank
To keep the water flow as smooth as possible, the installation of a pressure storage tank is additionally suitable, which reduces pump cycles. Due to space constraints, we decided against it.
Clean drinking water in the camper - filters, hoses, and connectors
Clean drinking water depends significantly on two factors: the water source and the cleanliness and quality of equipment such as hoses, connections, and water tanks. Additionally, water quality can be influenced by drinking water filters.
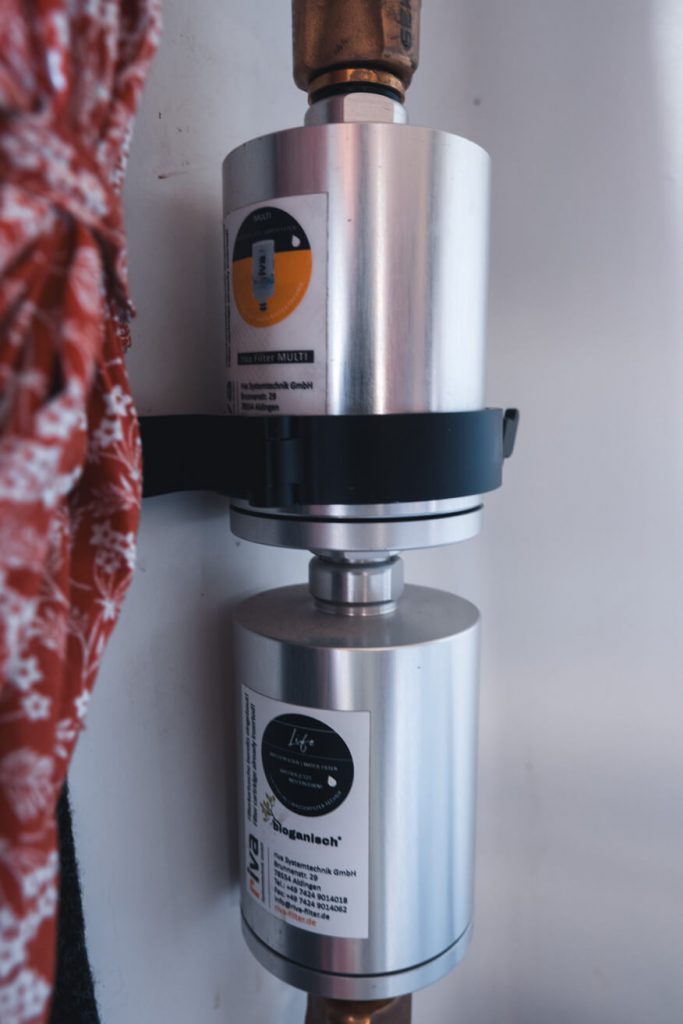
Water purification through water filters - Riva Life and Riva Multi
We filter the water when we draw it from the tank, just before it goes into our glasses. This has the advantage that we don't have to worry about the water quality when filling the tank, and even if the water stays in the tank for a while or if it's very hot, we can still drink the water without any concerns.
We use two filters for the filtration: rivaALVA Life*, a block activated carbon filter for natural water, as well as the rivaALVA Multi, a filter for legionella and bacteria. These are available individually or, for example, as part of a combo package. rivaAlva Explorer Overland*.
With the Geka plug system, we also have the option to switch the filters before filling the tank, so we can filter the water during filling. However, we have only done this once so far, as the water was quite dirty.
Sediment filter - DIY
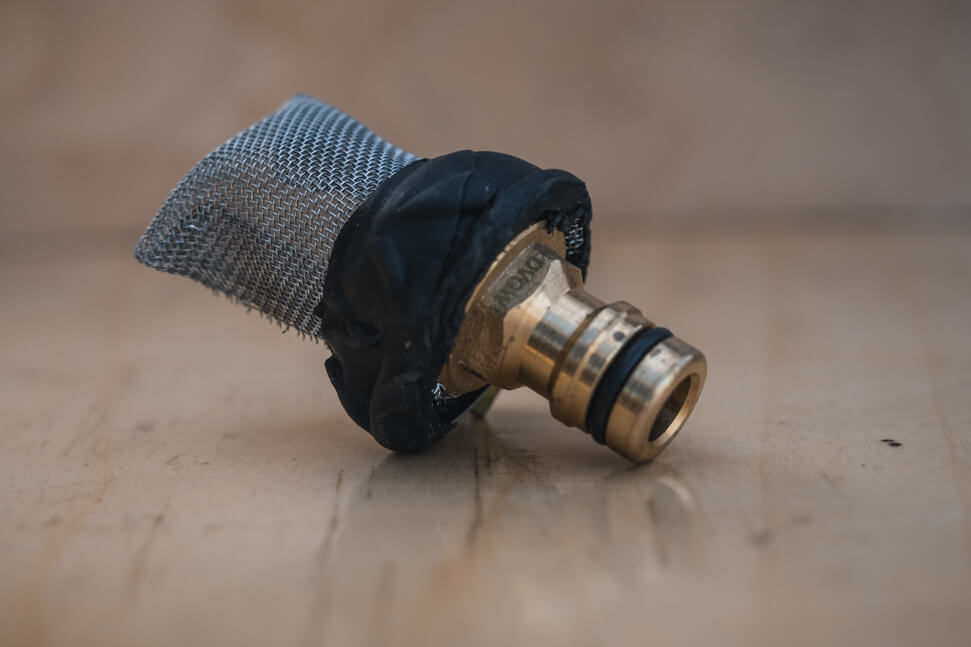
For filling from natural water sources, we have built a filter to keep the pump and hoses free from coarse sediments. We attached a fine steel mesh to a Geka connector for this purpose. This allows us to easily connect it to the hose as needed.
Hoses and hose connections
It was important to us that all equipment downstream from the filters meets drinking water quality standards. Our waterhose*, die GEKA Plus Steckverbindungen*, als auch die Hähne sind daher alle Trinkwasserzertifiziert. Die Zertifizierung stammt von der DVGW (Deutscher Verein des Gas- und Wasserfaches e.V.).
For simplicity, we have equipped our entire system with drinking water-certified equipment, even though it may not have been necessary for the components before filtration.

Building our fresh water system
After acquiring all the necessary components, we can finally begin to build our watersystem.
Tank vorbereiten – Tankdurchführung und Entlüftung
If not already present, ports for filling and withdrawing as well as a tank vent have to be installed.
For water withdrawal, it's best to install the tank port at the bottom so you can empty the tank completely. Ours was already installed.
In addition, it makes sense to have a tank port for water intake. This should be installed at the top of the tank. Only then can the full volume of the tank be utilized. We didn't consider this during our installation and fill through the tank lid. While convenient, we lose some liters of capacity as a result. This loss of capacity is noticeable to us.
Tank ventilation
To allow the tank to be filled and emptied, air must be able to escape and enter. For this purpose, a tank vent is necessary. You can also install this at the top of the tank. We inserted a small tube into the tank lid for this purpose.
Securing the tank
During sudden braking or on bumpy roads, significant forces can act on the tank. Therefore, it must be properly secured. We have mounted small wooden slats to prevent the tank from shifting, and we use a securing strap stretched over the tank, which is tightened securely.
However, keep in mind that the larger the capacity of your tank in liters, the more stable the securing needs to be.
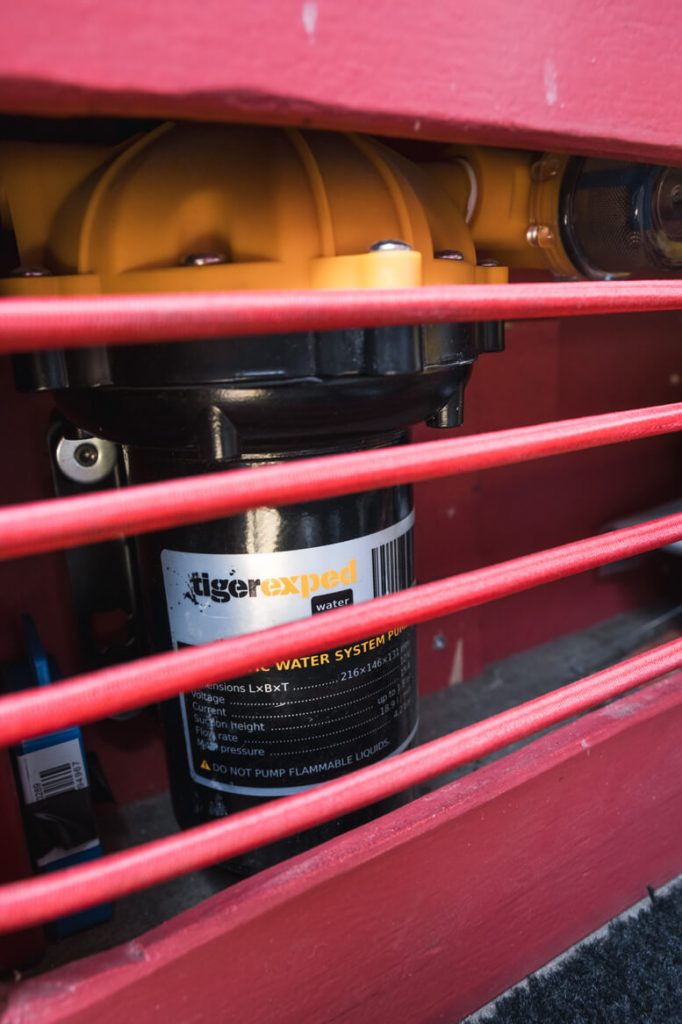
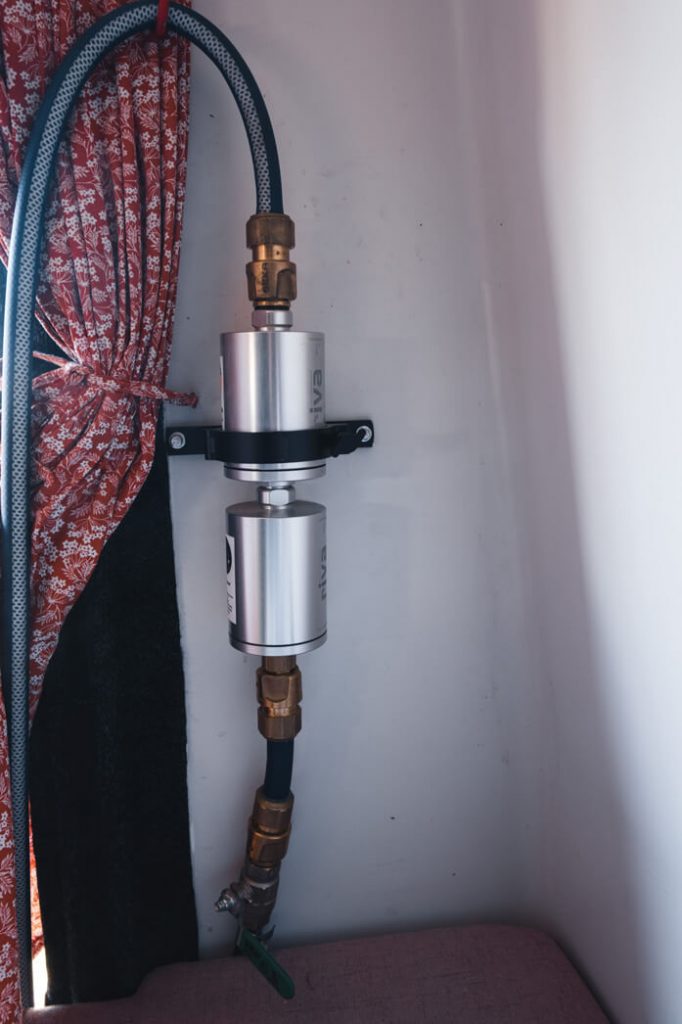
Install the high-pressure pump and pre-filter
After mounting the tank in its designated position, we install the high-pressure pump. The pump can be mounted either horizontally or vertically. When choosing a suitable installation location, keep in mind that high-pressure pumps can be quite noisy. Mounting the pump on the floor base significantly reduces vibrations compared to mounting it inside cabinets or on partition walls.
It's also important that the pump is easily accessible. Even though high-pressure pumps require minimal maintenance, it's crucial to be able to access the pump to clean the pre-filter and quickly reach it in case of a leak.
A pre-filter should be installed before the pump. Our Tigerexped pump already includes one in its package. Pre-filters help ensure that a high-pressure pump can achieve its long lifespan. Especially when filling from natural sources, water often contains suspended particles. The pre-filter removes these particles, preventing them from entering the pump and causing damage.
Install hoses and connections
Now all the hoses are connected. Since we only have cold water and the water is used solely as drinking water and not, for example, for showering, our setup is quite simple. However, we have designed our water system so that we can switch the pump and use it both for filling and extracting water (see drawings).
We secured the quick couplings with hose clamps. Our test with cheap hose clamps purchased on Amazon was negative. Therefore, we recommend getting good quality hose clamps from a hardware store. Nobody wants water damage in their camper.
Screw connections require a bit more effort to secure. To ensure tightness, Teflon tape or hemp can be used. We use Teflon tape for all our screw connections.
Connect the high-pressure pump to the power supply
For the high-pressure pump, a dedicated electrical circuit should be installed and adequately fused. The wire gauge chosen should be sufficient based on the distance from the pump to the battery. According to Tigerexped's recommendation, the fuse for our pump should be 25 A. The following table provides an overview of the required wire gauge based on distance.
| Distance between battery and pump in meters | 0-6 | 6-9 | 9-15 | 15-19 |
| Wire gauge in square millimeters (mm²) | 2,5 | 4 | 6 | 10 |
We also install an easily accessible switch. With this, we can disconnect the pump from the power supply as needed (for example, in case of leaks).
Withdraw drinking water and fill water tank
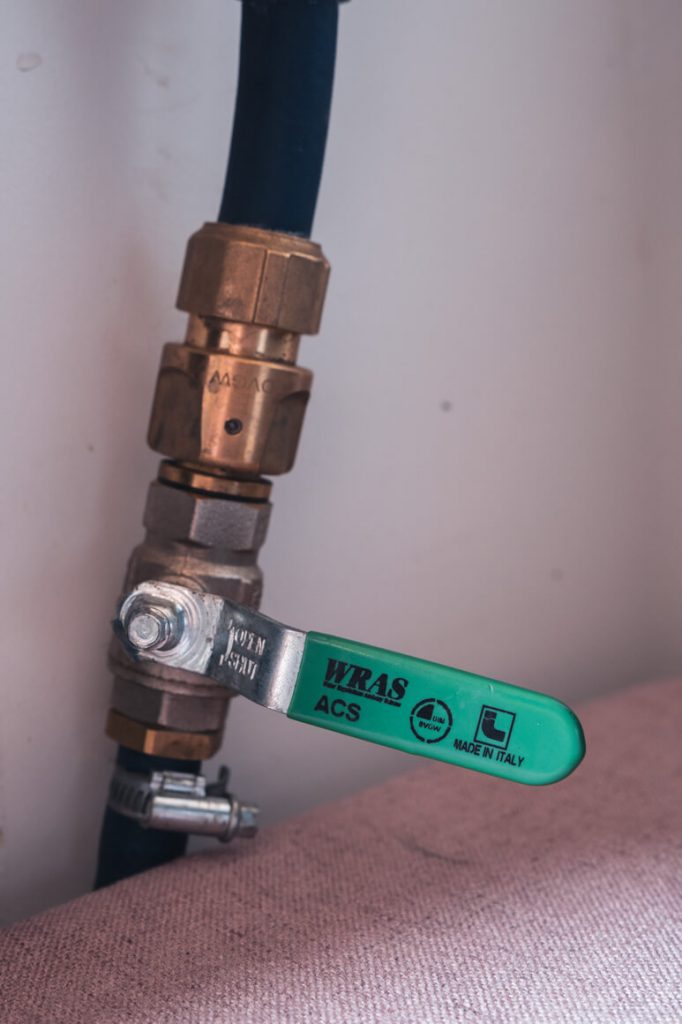
Withdraw water
Between the tank and the pump, we have installed a Y-piece with a valve at each end, both equipped with quick couplings. This setup allows us to close the connection to the tank and easily switch the pump, enabling us to draw water not only from the tank but also from a natural water source, for example.
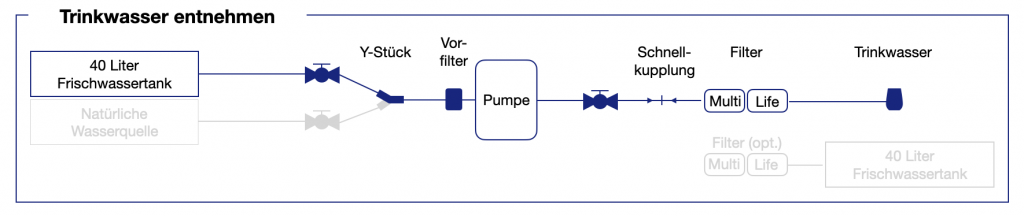
Most of the time, our pump is connected so that we can pump drinking water from the tank. It passes our water through both drinking water filters before the water comes out fresh and treated from our faucet.
Fill water
To ensure a constant water supply in the camper, we have two options for filling our tank - through a tap connection or from natural sources.
Water supply via tap connection
If a tap connection is available, we can simply connect our filling hose directly to the tap to fill the tank. For this method, we have adapters in various sizes with both internal and external threads. We screw these adapters onto the taps, attach our water hose, and fill the tank directly.
Our water pump is usually connected to pump drinking water from the tank. To fill from natural sources, we need to switch the pump connection.
Water supply from natural water sources
If there is no tap available, we can also pump water from rivers and lakes into the tank. Normally, our water pump is connected to pump drinking water from the tank. To fill from natural sources, we need to switch the pump connection. For this purpose, we have installed a Y-connector between the tank and the pump, each end equipped with a valve. We close the valve towards the tank, attach a filling hose to the second outlet of the Y-connector, and place it into the lake or river. To prevent larger sediments from entering the pump and tank, we also connect our homemade sediment filter to this hose. Using the Geka plug system, we can disconnect the water filters from the pump and attach a filling hose. Theoretically, we can leave the filters connected and filter the water during filling. However, we only do this when the water we are filling is heavily contaminated.

Conclusion regarding our water supply in the camper
We manage with the 40 liters for just about a week, provided we have a nearby water source that we can use for washing and rinsing. If this isn't available, we do notice that the water runs out a bit too quickly. Unfortunately, we lose a few extra liters when filling our tank through the opening.
We have therefore planned to install a water supply in our tank to make use of the full 40-liter volume. Additionally, we want to get a 20-liter water canister with a drain tap, which we intend to attach externally to airline rails. This way, we have additional water that we can use solely for washing and rinsing, as it doesn't necessarily need to be filtered.